

I had so many people ask me how I made all of the pretend food for my daughter's bakery, that I decided to do a little "tutorial". I didn't take pictures during the process, but I will do my very best to explain each and every step for you. There was definitely a bit of trial and error in this project so I'm hoping my tips will help it be even easier for you! I've broken down the supply list for each specific item of food.
Cupcakes
Here's what you'll need:

Written out supply list: Expanding foam (Touch 'n Foam Max 3x Fill), gloves, lightweight spackling (I used about 32 ounces for my whole project - cheaper at Lowe's or Home Depot than Walmart), Cupcake liners (I like the foil ones so the paint won't show through and also because they come with paper liners in between that I used for displaying the little chocolate desserts), cardboard, muffin tin, paint colors of your choice, large cake decorating coupler, large cake decorating tips (I used the closed star one on the right for my cupcakes), disposable decorating bags.
Okay are you ready for the process? First things first, gather your supplies (duh). Cut cardboard circles to fit into the bottom of your cupcake holders. I glued them down using some elmer's glue just for peace of mind. This was actually my second batch of fake cupcakes (those were definitely my trial and error batch and are now in the trash). The first ones I didn't do this and the bottoms were rounded and not as sturdy. So don't skip this step!
Now to prepare for the foam part which is really pretty darn fun! Have a large clean work space. Get some paper towels torn and ready to go to wipe the gunk off the tip of the foam. Get your gloves on. Guys, this stuff is RIDICULOUSLY sticky. You MUST wear gloves! The instructions on the foam say to shake it for 30 seconds, which I did. If you get a different brand read the instructions on the back. On my first batch of cupcakes, I used a different brand (the container was red) and didn't like it. It didn't expand as much as the Touch n' Foam and the tops of everything were much more bumpy than round.
Now to prepare for the foam part which is really pretty darn fun! Have a large clean work space. Get some paper towels torn and ready to go to wipe the gunk off the tip of the foam. Get your gloves on. Guys, this stuff is RIDICULOUSLY sticky. You MUST wear gloves! The instructions on the foam say to shake it for 30 seconds, which I did. If you get a different brand read the instructions on the back. On my first batch of cupcakes, I used a different brand (the container was red) and didn't like it. It didn't expand as much as the Touch n' Foam and the tops of everything were much more bumpy than round.
Okay back to the fun part - SLOWLY spray the foam into the liner. Only fill them half way full. This stuff really expands. When I sprayed, I tried to keep the straw in one place rather than circling around so there would be less bumps on the top. Now watch the foam expand. It's really cool! Give it a few hours to harden. (At this point I moved on to making the donuts/bagels).
Now that the foam is hard (I picture myself doing a cooking show here and pulling out the already hardened "baked cupcakes" haha), you'll use a serrated knife to cut a bit of the tops off to create a surface for the "frosting" to adhere to. If you plan on just using the cupcakes for a display and not to be played with, you could probably skip this step.
Next step is to paint the cupcakes. I mixed some tan, yellow and a bit of brown to get a "cupcake color" and I mixed black and dark brown for the chocolate cupcakes. Allow the paint to dry. Remember that first brand of foam I used? Yeah, paint did NOT work on it. The paint separated into little circles and looked awful, I fixed the problem by having my blowdryer on the whole time while painting them so the paint would dry before it could separate. BUT this new brand worked perfectly with the paint!
Next step is to do the frosting! Wahoo!! Now here is where I made a judgement error that I'm saving you from doing. I decided to frost them all with the plain color and paint them later so I wouldn't have to mix up a bunch of different colors and deal with changing out the bags and such. Don't be like me. That was a bad idea. Painting them after the fact took easily 14 times longer. SO divide your lightweight spackling (Yes, it must be the lightweight kind! I tried two other products and they just didn't work as well) into some styrofoam cups. Add acrylic paint to them and stir until well combined. Now put your large cake decorating tip and coupler (I used the closed star for mine, but you could use whichever one you want) into the disposable bag. Now put the "frosting" into the bag. A trick to keep the outside of the bag from getting covered in frosting is the flip the top of the bag down. To frost the cupcakes start on the outside and work your way around the cupcake, as you reach the point where you started, continue around making sure to overlap the lines a bit. Continue doing this until you get to the center. Squeeze a little bit extra in the center to get a pretty finish. Set the frosted cupcakes aside (if you move them out into the sun, they will harden faster). You could add some glitter or beads for (sprinkles), but I didn't want to mess with that. That's it! You did it!

Donuts/Bagels
Here's what you'll need:

While I already had the expanding foam out and gloves on, I decided to play with it a bit and see what else I could create. I tried little circles for cookies, but they ended up being waaaay too tall after they finished expanding. But the donuts/bagels turned out pretty well. They were originally going to be bagels, but have since switched to donuts as per my daughter's request. Any-who, to make them, you'll want to once again have some paper towel pieces ready to go to wipe off the extra foam on the tip. Now again, SLOWLY spray the foam making a circle. Let go of the trigger a little before you reach the end as it will continue to spray out leaving you with a large bumpy side. This takes some practice, but luckily this foam goes a really long ways and you'll get to make plenty of them lol. Don't make the inner circle too big. I though the foam would expand a ton and fill the circles, but the didn't I would have the "hole" be about as big as the bottom of a cupcake tin. Let them harden for a couple of hours. Now you can paint them. When I painted mine, I mixed yellow, tan and a bit of brown. Then I made it a little bit darker, painted over it again and used a paper towel to blotch it off. Once your paint is dry, finish by spraying the varnish over the top. This will make them shiny.

Small Chocolate Cakes
Here's what you'll need:

Written out supply list: Silicone muffin tin, Plaster of Paris dry mix, Lightweight Spackling, Paint colors of your choice, plastic bag (or cake decorating piping tip, coupler and bag).
These were probably the easiest thing to make. I followed the directions on the back on how to mix the Plaster of Paris. I believe it's 2 parts dry mix to 1 part cold water. I poured it into the muffin tin and allowed it to harden. Once it was totally hard, I took them out of the molds and painted them "chocolate" (mixed black and brown). Once the paint was dry, I put some of the colored lightweight spackle into a baggie, cut the tip of and piped on some "frosting". Done! You could spray it with varnish if you'd like it to be shiny and to protect the paint a bit more. I'm considering doing this.
You could use this same method for lots of different treats. Her bakery is small so we didn't need a gazillion things.

Cake
Here's what you'll need:
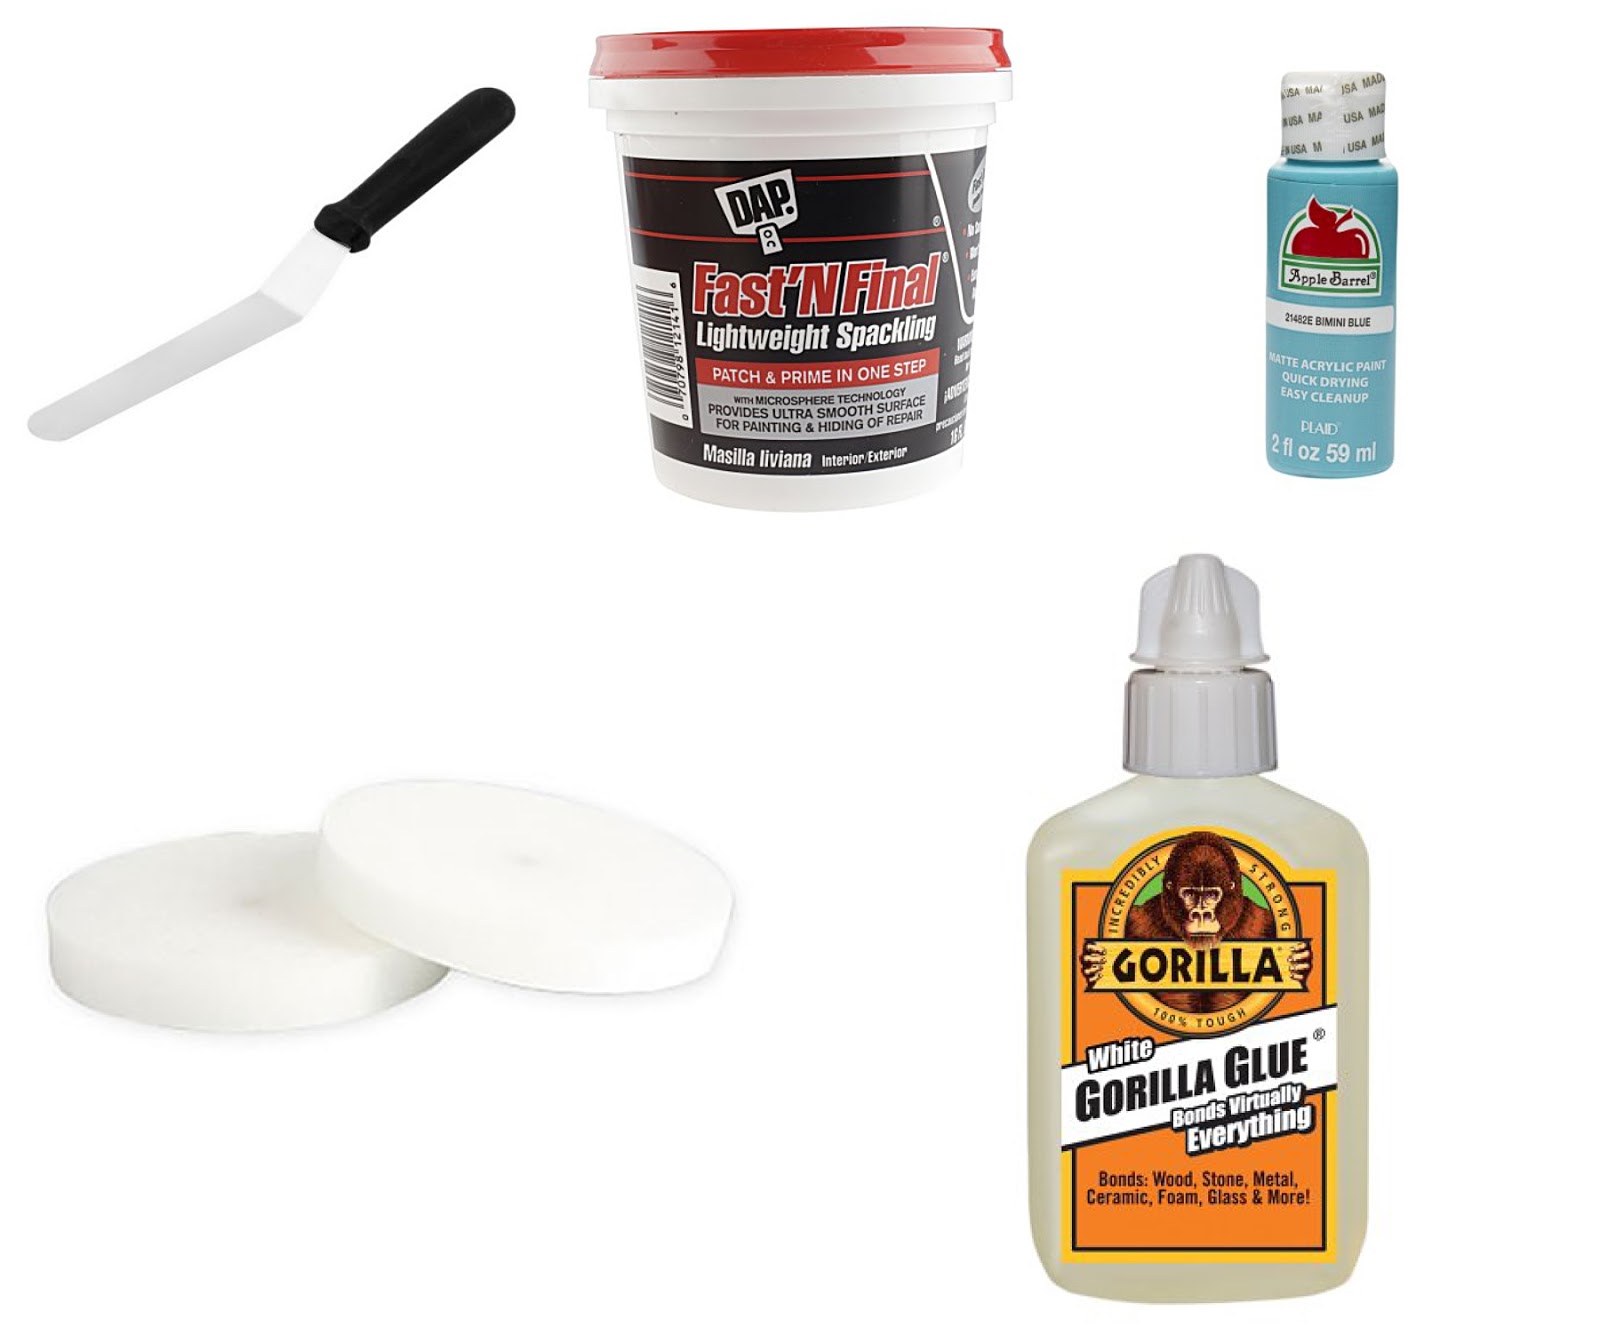
Written out supply list: Cake decorating spatula, Lightweight Spackling, Paint colors of your choice, styrofoam (I got mine at the dollar tree. They come it packs of 2. I used four for my cake), Gorilla Glue.
To make my cake, I started off with 4 styrofoam circles. I used Gorilla Glue to stick them together. I put just a little circle on the styrofoam between each layer and then put a heavy put on top to hold them in place until it was dry. I colored my lightweight spackling with acrylic paint and then used the spatula to spread it around like frosting. I wanted it to look more rustic like frosting rather than fondant, so I swirled the "frosting" back and forth a bit. Spackling is really workable so you can mess around with it. I put some freezer paper underneath the cake so it wouldn't stick to the counter. It is a bit hard to get all of the edges while trying to hold onto the "cake". You could use a popsicle stick or something stuck into the bottom to hold onto if you wanted. Let the "frosting" dry completely.
Now get a serrated knife and cut a slice out (You don't have to do this. You could just have the cake be a display, but I wanted to have once slice that my daughter could serve). I used the knife to carefully dig a little ravine for the middle "frosting". Paint the styrofoam to make it look like cake. I mixed black and brown for the chocolate color. once the paint is dry, pipe on some frosting (I used a plastic bag with the tip cut a bit) then spread it out with the spatula. Allow it to dry and you're done!

Petit Fours
Here's what you'll need:

Written out supply list: Styrofoam, Toothpicks, Lightweight Spackling, Cake decorating spatula, Paint colors of your choice, cake decorating piping tip, coupler and disposable bag, spray on varnish.
Now, if you had a square silicone mold, you could fill them with Plaster of Paris, but I used a couple of the styrofoam circles I had and cut them into little squares using a knife. Then I pushed down the edges and corners just a little to round them out. Stab the bottom of squares with a couple of toothpicks to make it easier to decorate. Color your lightweight spackling to make it whatever color you want. I was using leftover pink "frosting"so I painted over them after the fact. Use the spatula to spread the frosting on the top and sides of your styrofoam squares. I stuck the other end of the toothpicks unto some left over foam donuts to hold them up while drying lol. Allow the frosting to dry (if you put them outside in the sun it will dry pretty fast), then pipe some colored "frosting" on the tops of your petit fours. After that dries, spray them with varnish to make them shiny.

Cookies
Here's what you'll need:

Okay I lied, these were actually the easiest thing to make. In a styrofoam cup I mixed some Plaster of Paris. This time I didn't pay attention to the "recipe" on the back since I knew I wanted it to be a bit thicker. I actually mixed some up and once that was mixed well, I added in some more dry mix and only stirred it around a bit so there would be some clumps left in it to make the cookies look more realistic. I poured it onto the wax paper and allowed it to harden. Once they were hard, I painted them. Done!

Bread
Here's what you'll need:

This bread is actually using the foam I used from the first batch of cupcakes. You can tell it's more lumpy which was fine since it's more of a sweet bread anyways not to be confused with "sweet breads". I don't know what the bread will turn out looking like with this other foam, but I think you should still use this brand since painting on the other one was a beast.
Line your bread pan with foil. Or just buy a disposable pan. Fill your loaf about 1/2 way full. Allow the foam to expand and dry. I had to pull the foil out after a few hours and cut a little slice in the bottom to allow the foam underneath to harden. If you were using a disposable tin that you wanted the bread to stay in forever, you may want to put some cardboard down there to ensure the bottom would stay flat. After the foam was dry (I waited a day or two just in case), I removed the foil and painted the bread. You could spray it with varnish is you want it to be shiny.

WHEW! Was that helpful or just overwhelming???
As for the canopy on top, I sewed it and then hung it with white shower curtain rods. And I built the little bakery display using a 1x12 board that was 10 feet long I also used a 1x2 and a 1x4. The wood cost about $25, but I do have some leftover 1x2 and 1x4. This is what it looks like before sanding and painting. If plexiglass wasn't so expensive, I would've put some on the front.

I hope this was helpful for you. If you decide to make some pretend food, please send me pictures!